MIOConsoleConnect + Digital Performer Tips
The following are tips to get the most out of using MIOConsoleConnect and Digital Performer together. By utilizing the following advice, you will save yourself some time working around the tricks and traps of Digital Performer.MIOConsoleConnect is an AU in Digital Performer
Since Digital Performer has first-class support for the AU plugin standard, we did not make a MAS-specific plugin for MIOConsoleConnect. Instead, you can simply use the AU plugin with Digital Performer.You should be aware of a quirk in DP/MAS that affects the use of AU plugins in Digital Performer. In order to fully instantiate an AU plugin in Digital Performer you must have the I/O on the mixer strip fully configured.
If you insert MIOConsoleConnect (or any AU for that matter) and the DP plugin window opens with no plugin UI, you do not have the mixer channel you are trying to use configured. All you need to do to get things rolling is make sure that the output for the mixer strip is set to a valid, live output bundle.
When things go wrong: Partially instantiated AU
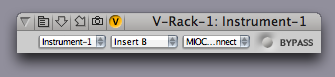
Where to Insert MIOConsoleConnect
In Digital Performer, you will need to decide if your MIO Console configuration should apply to the entire session, or if you want it to change from sequence to sequence within the session. If you want it apply to the entire session and use multiple sequences per session in DP, you will want to add the MIOConsoleConnect plugin in to the session’s V-Rack. If you only use one sequence per session, or if you want the MIO Configuration to be different in each sequence, you can insert the MIOConsoleConnect plugin in each sequence, and DP will switch the plugin as it moves from sequence to sequence.Where to Insert MIOConsoleConnect when using V-Rack (recommended)
 Due to the MAS issue described above, you need to be a bit careful when inserting
MIOConsoleConnect in the V-Rack. We recommend that you:
Due to the MAS issue described above, you need to be a bit careful when inserting
MIOConsoleConnect in the V-Rack. We recommend that you:
- Create a new mono Master Fader in the V-Rack
- Set the output for the Master Fader to an unused bus (for example Bus 64) — this is very important
- Insert MIOConsoleConnect on this mixer strip
Where to Insert MIOConsoleConnect per Sequence
If you choose to insert MIOConsoleConnect in each sequence rather than in the V-Rack you will need to keep some things in mind: Due to the MAS quirk described earlier, you need to be a bit careful when inserting MIOConsoleConnect in the Mixer. We recommend that you:- Insert MIOConsoleConnect in each sequence, or you will lose access to MIOConsole, or may experience inconsistent recall of the MIO Parameters.
- Launch MIOConsole before inserting MIOConsoleConnect or opening a session with MIOConsoleConnect inserted. This will keep MIOConsole from being quit and relaunched as you move from sequence to sequence.
Routing for Insert processing in Digital Performer
Since Digital Performer does not provide an I/O plugin for inserting an audio routing loop to external processing, you need to be a bit careful when configuring the routing in Digital Performer. If you don't follow this approach, you have a good chance of setting up a feedback loop (and no one wants that!)The approach described below is also illustrated in the ULN-2 Process Return tutorial movie.
In order to insert a +DSP process in DP, you need to route the audio to be processed to discrete channels on the Mobile I/O. The critical point is that you cannot send the audio that you want to process directly to the same outputs that you will be using for monitoring as completing the return will create a feedback loop.
Configuring Bundles and MIOConsole to make your life easier
Since DP allows you to configure your physical I/O using Audio Bundles, you find that it makes routing a lot easier if you pre-configure some audio bundles and name them in a way that makes sense.In the illustrations below, we have created bundles for I/O and +DSP Loop Processing. Here is what the Audio Bundles window looks like after the bundles have been created and named:
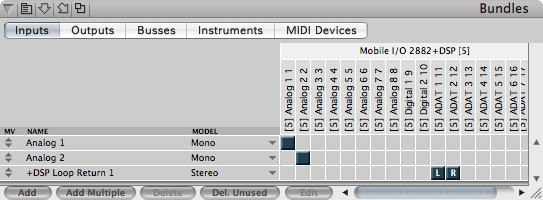
The Input Bundle configuration
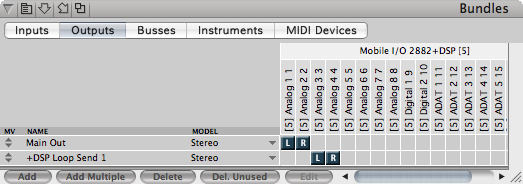
The Output Bundle configuration
As you can see from the illustrations above, we have created two Mono input bundles for Analog 1+2 to be used as inputs for tracking and a Stereo input bundle for the +DSP return. WE have also created two Stereo output bundles; one for the Main Mix (Main Out) and one for the +DSP Send (+DSP Loop Send 1).
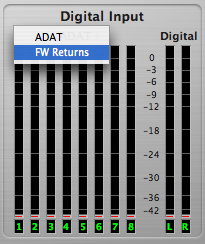
Finally, if you are using a 2882, you will need to make sure that you have FW Returns selected (rather than ADAT) in the Digital I/O meters section of MIOConsole:
To insert a +DSP process chain on a single channel
Follow these steps:- On the mixer strip of the channel that you want to process in +DSP, select a Mobile I/O output that is different from the main stereo output that you are using for the rest of the mix. If you have not yet created a bundle for that output, you can create a new bundle on the fly for your output channel. So, for example, if you are monitoring your main mix on DAW 1 and 2, you could send the channel out on DAW 3.
- Route the selected DAW Channel to your processing chain in +DSP.
- Route the output of your processing chain to a Process bus output in +DSP (for example Process 1).
- Route the Process bus to your FireWire return using the patchbay (for example, FW Return 1).
- Create an Aux Fader in your DP project, and set its input to correspond to the FW return channel you have selected (ADAT 1 for FW Return 1, etc.).
- Assign the output of the Aux fader to the main output bundle of your mix
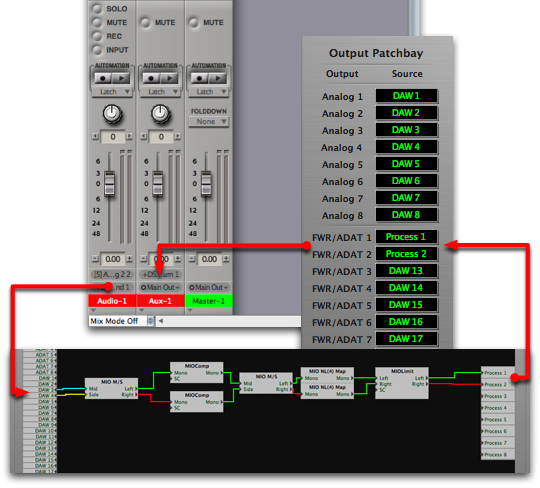
Single Channel +DSP Mid/Side Compressor
To insert a +DSP process chain on a submix
Follow these steps:- On the mixer strip of the channels that you want to process in +DSP, select a bus to route the submix to (for example, Bus 1-2). You can assign as many channels as you want to the send bus and form a submix using the DP mixer.
- Create an aux fader track, and set the input of the aux to the bus that you sent the submix to (e.g. Bus 1-2). Set the output of the aux to Mobile I/O outputs that are different from the main stereo output that you are using for the rest of the mix. If you have not yet created a bundle for that output, you can create a new bundle on the fly for your output channel(s). So, for example, if you are monitoring your main mix on DAW 1 and 2, you could send the channel out on DAW 3 and 4.
- Route the selected DAW Channels to your processing chain in +DSP.
- Route the outputs of your processing chain to a Process bus outputs in +DSP (for example Process 1 and 2).
- Route the Process busses to your FireWire returns using the patchbay (for example, FW Return 1 and 2).
- If you are using 2882, make sure that you have FW Returns selected (rather than ADAT) in the Digital I/O meters section of MIOConsole.
- Create another Aux Fader in your DP project, and set its inputs to correspond to the FW return channels you have selected (ADAT 1 for FW Return 1, etc.).
- Assign the output of the Aux fader to the main output bundle of your mix
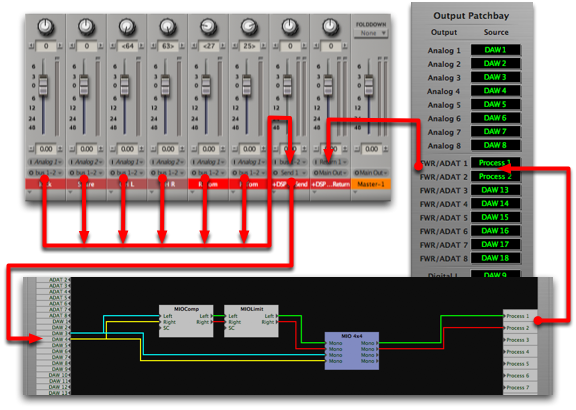
Multichannel Bussed +DSP Parallel Compressor