MIO Console Control Surface Support
MIO Console v.5.1 adds extensive support for external tactile control surface units. MIO Console supports two different Control Surface communication protocols: Euphonix’s EuCon and Mackie Design’s Mackie Control Protocol. Both protocols are supported simultaneously, so you can use both types of controllers at the same time. If both controllers are controlling the same elements of MIO Console, MIO Console will keep both protocols synchronized. More interesting, however, is that the two different control surface systems can be used to control different parts of MIO Console at the same time, allowing you to control different parts of a mix or even two different mix busses simultaneously with multiple control surface units.
The first step in using the Control Surface support is enabling and configuring your Control Surfaces. This is done from the MIO Console Preferences panel. These preferences are accessed via the MIO Console > Preferences… command (or via the <command>-, key sequence). When you select the Preferences command, the Preferences sheet is shown on the MIO Console window:
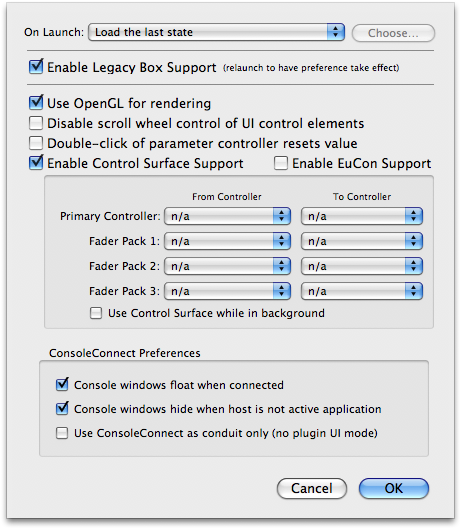
The relevant preferences for Control Surface support are:
- Enable Control Surface Support — When checked, MIO Console will listen to Mackie Control protocol messages on the specified MIDI Ports. Use the controller popups to select the MIDI I/O for your control surface. The default is for this to be unchecked.
- Primary Controller — Select the MIDI ports for the primary (generally the master section) Mackie Control Protocol control surface unit. MIO Console will treat this as the right-most controller in terms of fader layout
- Fader Pack 1 — Select the MIDI ports for the Mackie Control Protocol first fader pack used in the system. MIO Console will place this fader pack to the left of the Primary Controller in terms of fader layout
- Fader Pack 2 — Select the MIDI ports for the Mackie Control Protocol first fader pack used in the system. MIO Console will place this fader pack to the left of Fader Pack 1 in terms of fader layout
- Fader Pack 3 — Select the MIDI ports for the Mackie Control Protocol first fader pack used in the system. MIO Console will place this fader pack to the left of Fader Pack 2 in terms of fader layout
- Use Control Surface while in background — When checked, MIO Console will continue to use the Mackie Control Protocol Control Surface units, even if it is not the active application on your computer. Uncheck this if you will use the same control surface units in another host program too. This does not apply to EuCon Control surfaces as EuCon manages application switching.
- Enable EuCon Support — When checked, MIO Console will automatically connect to EuCon services if you have the EuCon software and hardware installed. This box is not checked by default. If you have a EuCon control surface, you must check this box in order to use it with MIO Console. If you do not wish to use your EuCon control surface with MIO Console, uncheck this box and MIO Console will disconnect from EuCon services.
Once you have enabled support for the type of surface you want to use, and, in the case of Mackie Control Protocol surfaces, have selected the relevant communication ports, MIO Console will connect to the surfaces and begin communication, including updating of the surface faders, scribble strip read-outs, and metering.
Note: If you wish to control MIO Console via EuCon and will be using ConsoleConnect, you must use ConsoleConnect in Condiut only mode, as EuCon will automatically disconnect from MIO Console when it is running as a plugin.
Note: If you wish to control MIO Console via Mackie Control Protocol and will be using ConsoleConnect you will need to determine if you also intend to control the host application with the Mackie Control surface. If you will use the surface with your host, you must use ConsoleConnect in Condiut only mode, as the control surface will become confused if you have both MIO Console and the host communicating with it at the same time. You will also need to ensure that the "Use Control Surface while in background" option is not checked, so that MIO Console will automatically disconnect from the surface when you switch to the host app.
If you will not use the Mackie Control with your host software, and do use MIO Console as a plugin via ConsoleConnect, then you will need to ensure that the "Use Control Surface while in background" option is checked in MIO Console Preferences, otherwise MIO Console will disconnect from the surface when it switches to plug-in mode.
The details of working with MIO Console’s Control Surface support are similar, but not precisely the same for the two different Control Surface protocols. The details are explained below in the sections on EuCon and Mackie Control.Details of EuCon Control Surface Support
The EuCon protocol is supported by all of Euphonix’s control surface hardware including the Artist series (MC Control and MC Mix) and the Pro Series. While MIO Console should work well with the Pro Series, we have not done any testing with that hardware.
The EuCon protocol works by having the EuCon client application (MIO Console in this case) build a model to represent the controllable items in the client and their structure and organization. This model is used by the EuCon system to map the controls over the available control surface hardware. Since the mapping is done by EuCon, much of the details of interacting with the control surface are acutally implemented in EuCon and are consistent from application to application.
EuCon and EuControl provide facilities for locking strips to faders and locking the Control Room (Monitor Control) section and transport control section to a specific application. All of these facilities can be useful when working with MIO Console, especially the Control Room locking if you are using the MIO Monitor Controller to control your source switching and monitor level. Please consult your EuCon documentation for details on how to use these facilites of EuCon.
Control Room Support
The Control Room Controls are only available on the MC Control Hardware (and are not available on the MC Mix Hardware).
The Control Room knob on the MC Control will control the Monitor Control Level in MIO Console, if you have configured the Monitor Controller. Note that the Control Room knob provides very fine control; don’t turn it too fast when you first use it — experiment a little to get a feel for the gain ramp. Pressing the Control Room knob toggles the state of the Monitor Control Mute.
The Setup tab on the MC Control touch screen provides access to the source selection list and the cut (mute) and dim buttons. You can select from the configured Monitor Controller source from the source list via the MC Control touch screen, and you can also contro; the Mute and Dim state of the Monitor Controller from the touchscreen.
Mixer Model
MIO Console maps the v.5 mixer strips onto the EuCon surface in the order that they appear in the v.5 mixer window. If you want to change the order of the strips on the surface, simply change the order of the strips in the window. As soon as you finish reordering the strips, MIO Console will update the model on the surface.
Since each send in the MIO Mixer has its own strip in the send window, MIO Console supports switching the EuCon model to map the sends to a selected bus. When you select the sends, the currently selected send bus is mapped onto the surface. If you select sends again, the next send bus is mapped onto the surface. You can also return to the main Mix window at any time.
Unfortunately, due to a bug in EuCon at this writing, the method for selecting the sends bus is different on the MC Artist and on the MC Mix surfaces.
To Select the Sends bus (or move to the next Send bus) on MC Mix
- Simultaneously press the MC Mix SHIFT and PREV buttons
To Select the Main Mix Window on MC Mix
- Simultaneously press the MC Mix SHIFT and RTZ buttons
- -or- Simultaneously press the MC Mix SHIFT and Mixer (nudge left) buttons
To Select the Sends bus (or move to the next Send bus) on MC Control
- Press the "Aux" soft knob
To Select the Main Mix Window on MC Control
- Press the "Mix" soft knob
- -or- Simultaneously press the MC Mix SHIFT and Mixer (nudge left) buttons
NOTE: If you accidently press the "Aux" or "Mix" buttons on the MC Mix, the functions will work as expected, but you will lose the ability to control the Pan on your strips, and the nudge and bank buttons will not function as expected. This is due to a bug in EuCon. In order to resolve this condition, simply press the Pan button on the MC Mix -- everything will return to normal operation.
MIO Console will automatically configure the EuCon strips to match the configuration of the underlying mixer strip (including channel name, panner, number of channel meters, input controls, etc.)
In the EuCon environment, the channel controls are mapped onto so-called ‘knob-sets’.
On the MC Control, you access the knobset by pressing the soft-knob labelled with the knobset name. The knobsets that are supported by MIO Console are the "Pan" and "Input" knobsets (as well as the "Aux" and "Mix" knobsets for switching amongst the send busses).
On the MC Mix, the knobsets are selected via the buttons on the left hand side of the surface. Again, the operative knobsets are "Pan" and "Input" knobsets (as well as the "Aux" and "Mix" knobsets for switching amongst the send busses — but these need to be avoided due to the bug described above).
Details of Mackie Control Protocol Control Surface Support
The Mackie Control Protocol is supported by the currently shipping Mackie Control Universal (with integrated USB interface) and Mackie Control Universal XT Fader pack products. It is also supported by the older Mackie Control products. In addition to the Mackie products, the Mackie Control Protocol is emulated by a number of third-party MIDI controllers and is supported with a wide-variety of generic MIDI controllers via the use of a third party program called LC Xmu available from Opus Locus.
With Mackie Control, the application (MIO Console in this case) controls all aspects of the control surface behavior — the Mackie Control is effectively a giant mouse with many buttons and sliders and readouts.
With the Mackie Hardware, only the MCU master section provides surface navigation buttons for nudging and banking as well as input, pan and send selection, so with most control surface implementations you need at least one master section to be able to access these features. With MIO Console, we have made these control surface commands available as mappable key-commands as well as control surface commands. This allows you access these functions from the keyboard of your computer, or, even better through a mappable HID like the ShuttleXpress or ShuttlePro. Since you can access these commands without having the master section, it is possible to configure a control surface by just using fader packs, which can provide a cost savings and a density improvement for certain applications.
Mackie Control Default Key Commands
| Command | Key Sequence |
| Control Surface: Select Pans | ⇧⌥⌃1 (Shift + Option + Control 1) |
| Control Surface: Select Input Gains | ⇧⌥⌃2 (Shift + Option + Control 2) |
| Control Surface: Select Sends | ⇧⌥⌃3 (Shift + Option + Control 3) |
| Control Surface: Bank Down | ⇧⌥⌃4 (Shift + Option + Control 4) |
| Control Surface: Bank Up | ⇧⌥⌃5 (Shift + Option + Control 5) |
| Control Surface: Shift Down | ⇧⌥⌃6 (Shift + Option + Control 6) |
| Control Surface: Shift Up | ⇧⌥⌃7 (Shift + Option + Control 7) |
| Control Surface: Toggle Legacy Mode | ⇧⌥⌃8 (Shift + Option + Control 8) |
Control Room Support
The Jog wheel on the MCU is mapped to the master volume on the MIO Monitor Controller, and may be used to control your main monitor level.
Mixer Model
MIO Console maps the v.5 mixer strips onto the Mackie Control surfaces in the order that they appear in the v.5 mixer window, left to right onto the units in the following order: Fader Pack 3, Fader Pack 2, Fader Pack 1, Primary Controller. If you want to change the order of the strips on the surface, simply change the order of the strips in the window. As soon as you finish reordering the strips, MIO Console will update the model on the surface.
Since each send in the MIO Mixer has its own strip in the send window, MIO Console supports switching the Mixer model to map the sends to a selected bus. When you select the sends, the currently selected send bus is mapped onto the surface. If you select sends again, the next send bus is mapped onto the surface. You can also return to the main Mix window at any time.
To Select the Sends bus (or move to the next Send bus)
- Press the ‘VPOT ASSIGN’ button labelled ‘SEND’
To Select the Main Mix Window
- Press the ‘VPOT ASSIGN’ button labelled ‘TRACK’
- -or- Press the ‘VPOT ASSIGN’ button labelled ‘PAN/SURROUND’
To Select the Input Gain on the VPot for the Strips
- Press the ‘VPOT ASSIGN’ button labelled ‘TRACK’
To Select the Pan Control on the VPot for the Strips
- Press the ‘VPOT ASSIGN’ button labelled ‘PAN/SURROUND’
The Fader Bank and Fader Nudge buttons allow you to move the window of faders on the surface across the mixer. MIO Console will automatically update the scribble strips, metering, fader levels, VPot readouts and button states as you shift through the strips.
When you have attentioned a send bus onto the surface, the “Assignment” readout will show the bus number of the attentioned send bus. When the main mix window is on the surface, the “Assignment” readout will be blank.
Press the switch on the V-Pot to toggle the state of the phase invert on the associated channel.
The Select button on each strip will toggle the select state of the associated mixer channel strip. You can use this with the mixers ad-hoc linking to make multi-channel adjustments to the mixer.
The transport controls control the state of the Record Panel's transport and also reflect the state of the transport. The Timecode readout will show the current record or playback time.
All other master section controls are currently unassigned