Record Panel
MIO Console integrates a dedicated multichannel recording interface. The Record Panel allows you to record with Mobile I/O right out of the box without needing to add any additional software to your system.
The Record Panel was purpose built for doing massive multichannel recordings with multiple boxes. We have deployed systems recording 72 channels at 96k, and have tested systems with even more channel capability. The Record Panel is not an editor; it does not support overdubs; it is optimized for capturing audio to disk with no muss and no fuss, with extreme reliability.
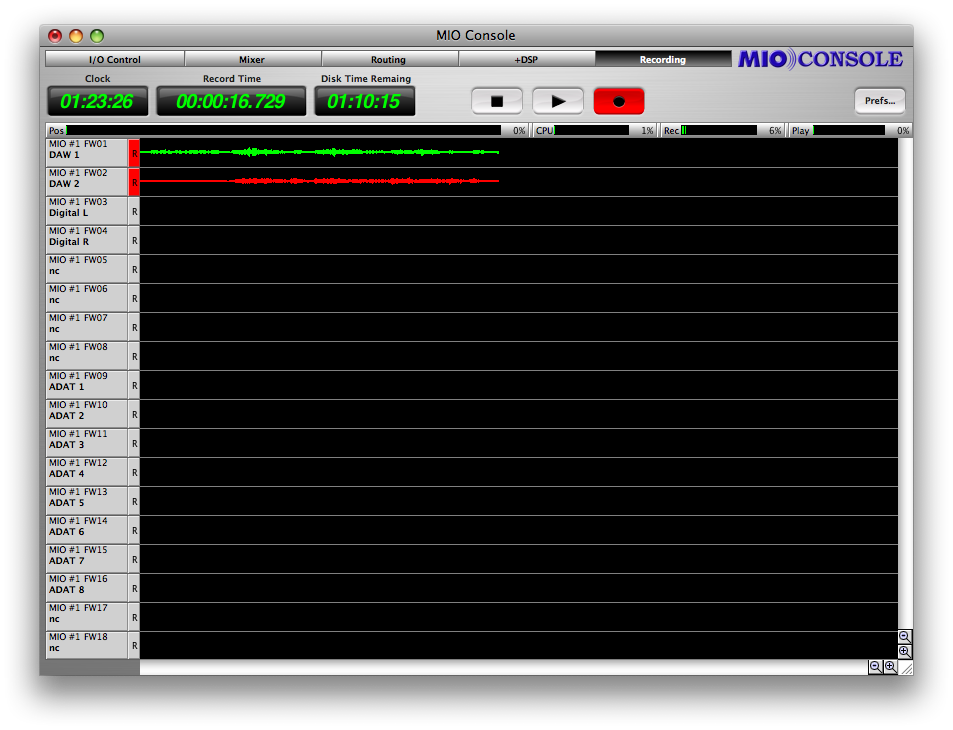
The Record Panel is accessed using the Recording panel button in the MIO Console window:
Record Panel Description
The Record Panel UI has a number of elements that work together to allow you to configure and monitor your recording.
The first element is the time readouts:

The Clock readout shows the wall-clock time and may be used for logging. It is formatted as HH:MM:SS.
The Record Time readout shows how long the recording has been running for when the Record Panel is in record mode, and how long the Record Panel has been playing for when in playback mode. It is formatted as HH:MM:SS.sss.
The Disk Time Remaining readout shows the time available on the selected recording disk. It automatically adjusts based upon sample rate, number of armed tracks, sample size and the amount of space available on the target disk. It updates as the recording progresses and is formatted as HH:MM:SS.
The next elements are the transport controls:
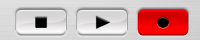
The first button is the Stop button. Clicking this button will stop both the record and playback transport. When all transports are stopped, this button will be lit yellow.
The second button is the Play button. Clicking this button will start the playback transport if the RP is not already playing audio. If the RP is already playing, clicking the button will stop the playback transport. When the playback transport is running, this button will be lit green.
The third button is the Record button. Clicking this button will start the recording transport if the RP is not already recording audio. If the RP is already recording, clicking the button will terminate the current take and start the next one, continuing recording. When the playback transport is running, this button will be lit red (as shown in the picture above).
The next elements are the progress meters:

The CPU Meter shows the amount of the real-time timeslice that is being consumed by the Record Panel.
The Rec Meter shows the amount of the record buffer that has been consumed by audio that has not been saved to disk. Under normal operation, this meter will pulse upwards and return to a value near zero periodically. If your disk is too slow, this meter will increase towards 100%, and if it reaches 100% it means that the disk is not recording fast enough and there will be glitches in the recorded audio. This meter is only active during recording.
The Play Meter shows the amount of the play buffer that is empty (not yet read from disk). Under normal operation, this meter will pulse upwards and return to a value near zero periodically. The RP uses an adaptive algorithm for filling the play buffer so the behavior of this meter may appear somewhat erratic. If your disk is too slow, this meter will increase towards 100%, and if it reaches 100% it means that the disk is not supplying data fast enough and there will be glitches in the playback audio. This meter is only active during playback.
The next element is the Play position meter:

When audio is playing back, this meter indicates the current playback position in the take. You can click in this meter during playback to cue playback to a different location within the take.
The next element is the tracks overview:
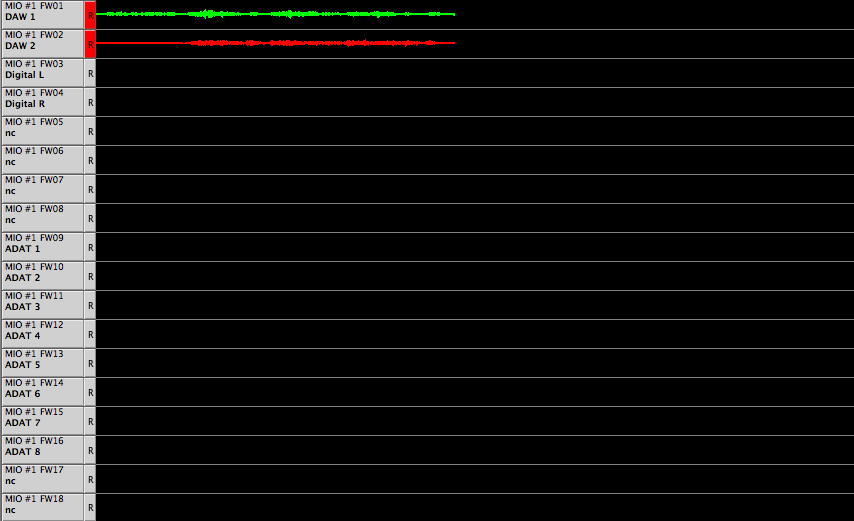
The tracks overview shows all the tracks available for recording. Tracks are added to the tracks overview in one of two ways:
- For 2d Expanded boxes: Only channels that have been assigned to FireWire returns (FW 01 — FW 18) will appear in the tracks overview. This allows you to control which tracks should be displayed; if you have no interest in recording a track, just don't assign it to FireWire.
- For Legacy Boxes: All input channels will automatically be displayed in the Record Panel because they are all automatically assigned to FireWire.
For 2d Expanded boxes, the tracks appear in the same order that the FireWire assigns appear in the mixer, so you can choose the track order by reordering the mixer strips in the 2d Mixer UI.
For legacy boxes, the tracks appear in the same order that they do in the Matrix and as inputs to the computer.
So, you have much more control over what appears in the RP when you have a 2d Expanded box. In addition to the rules listed above for how tracks are added to the the tracks overview, there is a global preference (controlled via the Recording Menu) that allows you to control whether tracks from offline boxes (that obviously cannot be recorded from) should be listed in the tracks overview. It may be useful to list tracks from offline boxes if you are doing offline configuration, but in general you will not want to show tracks from offline boxes.
When you are recording, each track shows a continuously updating track overview for the signal that has been recorded for that channel. You can scroll back and forth in time; if the horizontal scroller is set to the far right, the track overview will autoscroll, keeping the updating area of the track overviews in view.
Each track has a track header:

The track header shows the box, the FireWire channel and the channel name for the track. If the height of the tracks is too small for both lines to fit, only the channel name for the track is displayed. The channel name is automatically set by the source for the track; you can change the names by editing the input names appropriately.
To the immediate right of the label is a track record enable button. When the button is red, the track is record enabled and will be recorded the next time you hit record. While you can change the record enable state of the track while recording, it will have no effect on the current take — just the next take.
You can control the track enables directly from the Record Panel, or, if you are using a 2d Expanded box, you can control the record enables from the mixer. The mixer interface is especially convienent because one Record Enable button may actually control multiple tracks.
Finally, there are zoom buttons in the lower right corner of the window that control the zoom level of the tracks overview:

The buttons with the + in the magnifying glass icon zoom in (increase magnification), and the buttons with the - in the magnifying glass icon zoom out (decrease magnification). The buttons stacked on the right side control the vertical zoom and the buttons along the bottom control the horizontal zoom.
Recording
When you click the Record button (or initiate record using a control surface or command key), the Record Panel recording engine creates a new Take Folder for you. The Take Folder is created in the Record Folder that you set using the Recording > Set Record Folder… menu command. If you don’t set a Record Folder before you start recording, the RP will default to using the Documents folder in your home directory.
Each time you start recording a new Take Folder is created. Depending on the state of the Name Take Folders incrementally recording preference, this Take Folder will be named in one of two ways:
- If the preference is not checked, the Take Folder will be named:
Take_YYMMDDhhmmss
with YY = year, MM = month, DD = day, hh = hour, mm = minute, and ss = second
- If the preference is checked, the Take Folder will be named:
Take_NNN
with NNN = take number
Where:
- TT = track number
- <trackname> = the name shown in the second line in the track header
- <ext> = extension for the selected audio file type
The Take Folder will also contain a log file written by the recording engine.
While the RP is recording, each enabled track will show a continuously updating track overview that shows the history of the peak envelope of the channel. The the track overview will autoscroll as time progresses. You can use the scrollbars to adjust the currently displayed portion of the audio history, and the zoom buttons to control what period of time is displayed.
As each take is started, the current playback folder is set to the current take folder.
Clicking the Record button while the RP is recording will immediately start a new take which starts with the next sample of audio.
Clicking Stop will end the current take (and stop any current playback as well).
Playback
The RP can playback take folders (actually any folder of audio files). The file types and bit depths of the files in the folder can be mixed (the playback engine will automatically adjust). The playback engine ignores the sample rates of the files in the take folder — it simply plays out the samples at the current sample rate of the hardware.
As described in the previous section, the RP automatically sets the current playback folder to last take folder (so you can play back the last take by just clicking play). If you wish to play back a different take folder, use the Recording > Set Playback Folder… menu command to choose the Take Folder you want to play back.
When you click the play button, the RP playback engine will find the size of the recording, load the audio into the playback buffer, and begin streaming it to the HW. The audio is streamed out on successive DAW channels starting at DAW 01 on the first box and increasing until the first box is full (18 channels for current HW), then moving on to DAW 01 for the next box if there are more than 18 channels. It continues on in this way until it runs out of audio files or boxes.
Files recorded by the RP and played back without any naming changes will be played back in track order. If the take folder does not use RP naming conventions, then the playback track order will be determined by the alphabetical sort-order of the audio file names.
You can cue within the take by clicking in the Pos meter. If there is no Recording active, the Record Time read out will show the current time of the playback position within the take. Once the playback engine has run out of samples on disk, the playback engine will stop.
If you want to stop playback without stopping a current record take, you can click the Play button again to stop playback.
The RP playback engine enables a couple of cool tricks:
- You can record with no playback
- You can start playback, and then start recording a new take
- You can start recording a new take, and then start playback of the take while it is being record (basically read-after-write playback)
Clicking Stop will end the current take playback (and stop any current recording as well).
Multibox considerations
The Record Panel is capable of recording from multiple boxes simultaneously up to very large track counts. The boxes can even be spread across multiple Firewire busses to support more boxes than can be transported on one Firewire bus. It is critical, however, that all the boxes in the system are on the same clock.
If you run the boxes wild, it may appear that the recording is functioning, but eventually the recording buffer will desynchronize and distortion or glitches will be introduced into the recording.
You can use any available clock source to ensure that the boxes are all on the same clock reference. Both AES and Word Clock are good choices.
The Record Panel will only record from a box if there are tracks enabled on that box. You can use this feature to chain one box to another via ADAT (for example) and effectively use one box as an expander for another. The expander box can be on the FireWire bus and controlled by MIO Console, but it will not use FW bandwidth or isochronous resources if there are no tracks enabled on it. This allows you to effectively double the number of boxes that can be added to one FireWire bus.
Record Panel Key Commands
MIO Console defines a number of key commands that you can use to control the Record Panel from the keyboard or a configurable HID device:Record Panel Key Commands
| Command | Key Sequence |
| Record Panel: Zoom In Channels | ⌘⇡ (Command + ⇡) |
| Record Panel: Zoom Out Channels | ⌘⇣ (Command + ⇣) |
| Record Panel: Zoom In Timeline | ⌘⇠ (Command + ⇠) |
| Record Panel: Zoom Out Timeline | ⌘⇢ (Command + ⇢) |
| Record Panel: Scroll Channels Up | ⇧⇡ (Shift + ⇡) |
| Record Panel: Scroll Channels Down | ⇧⇣ (Shift + ⇣) |
| Record Panel: Scroll Timeline Right | ⇧⇠ (Shift + ⇠) |
| Record Panel: Scroll Timeline Left | ⇧⇢ (Shift + ⇢) |
| Record Panel: Play | ⌘J (Command + J) |
| Record Panel: Stop | ⌘K (Command + K) |
| Record Panel: Record | ⌘L (Command + L) |
You can change each of these key commands if you like. See MIO Console Key Commands for more details.
Record Panel Prefs
You control various aspects of the way that the Record Panel records using the Recording Preferences sheet. Access the sheet using the Recording > Recording Preferences… menu command or the Record Panel prefs button:

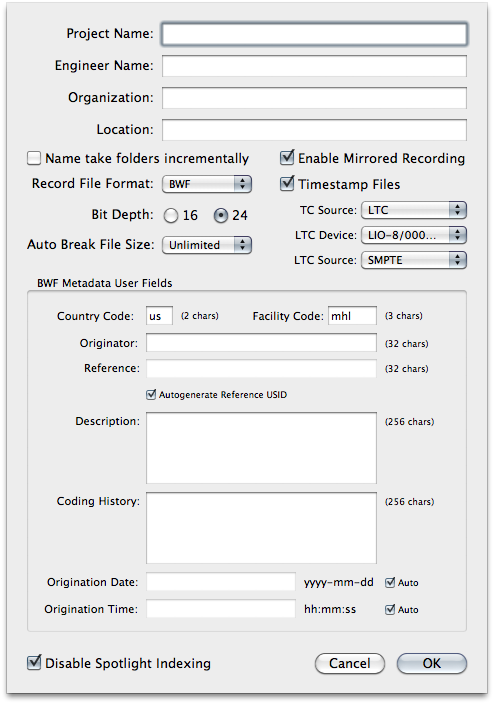
You can specify various text strings that may be included in the metadata included with some files using the 4 text entry fields.
There is a preference to control how Take Folders are named. Every time you hit record, the Record Panel will create a new Take Folder that will contain all the audio files for the take. If this checkbox is not checked, the Take Folder is named with a Date/Time stamp. If the checkbox is checked, each take will be sequentially named so that you will have a sequence of takes starting with 1 and incrementing by one each time you click record.
Next is a preference to enable Mirrored Recording. This will record your audio to two separate drives simultaneously. This gives you redundancy in case of a drive failure, or can be used to create a delivery drive that can be handed to a client immediately after recording. To use this feature, check the Enable Mirrored Recording checkbox, then use the Recording > Set Record Mirror Folder… menu command to choose your secondary record drive.
You may specify the file format that the Record Panel uses to record with the Record File Format popup menu which has the following choices:

- AIFF
- AIFF file type is the standard Apple Audio file. It requires finalization at the end of recording and has a 2 GB filesize limit. It does not support timestamping.
- SDII
- SDII is the streaming audio file type defined by Digidesign. It supports arbitrary file length and is always complete (it does not require finalization at the end of recording), but does require a Mac OS resource fork, and so is less portable to other systems.
- WAV
- WAV is Microsoft's standard RIFF audio file type. It requires finalization at the end of recording and has a 2 GB filesize limit. It does not support timestamping.
- BWF
- BWF is the EBU standard audio file based upon the WAV file format. It requires finalization at the end of recording and has a 2 GB filesize limit. It does support timestamping and standardized metadata.
- CAF
- CAF is the Apple's new standard audio file format. Very portable to other systems - but other systems may not have support for CAF yet; does not require finalization at end of recording and has no file size limit. Supports timestamping and extended standard metadata.
- CAF-LE
- CAF is the Apple's new standard audio file format. Very portable to other systems - but other systems may not have support for CAF yet; does not require finalization at end of recording and has no file size limit. Supports timestamping and extended standard metadata. This selection writes audio data in Little Endian Format; this is the native format for Intel processors.
The Record Panel allows for timestamping of recorded files. To timestamp your recordings:
- Set the Record File Format to "BWF".
- Click the Timestamp Files checkbox.
- Select the TC Source. There are two options: -TOD (Time Of Day) from your computer's clock
- Select the interface that will be receiving timecode under LTC Device
- Select the input that the timecode is received on. On the ULN-8, this would normally be the SMPTE input, but can be received from any other input that is routed to a FireWire channel. On the 2882 and ULN-2, timecode can be received on any input that is routed to a FireWire channel.
-LTC (Linear Time Code)
You can specify the bit depth that you would like to record at. Using 16-bit files saves space but provides less dynamic range. The Record Panel does not dither the incoming 24-bit signal to 16-bits (it is just truncated). You can use dither in the MIO Mixer to dither to 16-bit for recording if you will record at 16-bit.
Next is the Auto Break File Size popup. This allows you to have the Record Panel automatically begin a new take once your record files hit a specified size. The choices are Unlimited (no break), 512MB, 1GB, 2GB and 4GB. This can be used to ensure that your files respect cross-platform and file format size restrictions. The split between takes is sample accurate.
If you record using the BWF file format, the Record Panel will include a BEXT chunk with recording metadata. This probably is only useful to you if you work with an EBU facility. The BWF Metadata User Fields allow you to set the following codes in the BEXT chunk:
- Country Code (2 chars) and Facility Code (3 chars)
- These are used to create the USID (if the USID checkbox is ticked).
- Originator (32 chars)
- Sets the BWF Originator field.
- Reference (32 chars)
- Sets the BWF OriginatorRef field (unless the Autogenerate Reference USID box is ticked; if it is, then the USID is used).
- Description (256 chars)
- Sets the BWF Description field (supports the entry of line breaks).
- Coding History (256 chars)
- Sets the BWF CodingHistory field (supports the entry of line breaks).
- Origination Date and Time
- Set the BWF OriginationDate and OriginationTime respectively. If the "Auto" checkboxes are ticked, the corresponding field is automatically set as per the BWF standard.
More information about BEXT chunks is available from the EBU here.